


Semi-retired after more than 20 years as the owner and director of a private Orthopedic Physical Therapy practice, Chris now enjoys the freedom to dedicate himself to his passions—virtual cycling and writing.
Driven to give back to the sport that has enriched his life with countless experiences and relationships, he founded a non-profit organization, TheDIRTDadFund. In the summer of 2022, he rode 3,900 miles from San Francisco to his “Gain Cave” on Long Island, New York, raising support for his charity.
His passion for cycling shines through in his writing, which has been featured in prominent publications like Cycling Weekly, Cycling News, road.cc, Zwift Insider, Endurance.biz, and Bicycling. In 2024, he was on-site in Abu Dhabi, covering the first live, in-person UCI Cycling Esports World Championship.
His contributions to cycling esports have not gone unnoticed, with his work cited in multiple research papers exploring this evolving discipline. He sits alongside esteemed esports scientists as a member of the Virtual Sports Research Network and contributes to groundbreaking research exploring the new frontier of virtual physical sport. Chris co-hosts The Virtual Velo Podcast, too.


Thanks so much for this article. I’ve been experiencing pain when seated at work and when driving. 99% sure it is PS. I’m going to give your routine a go and stay off the bike for a bit.
Good luck, Gary! Hopefully the routine is the right plan for you. Feel free to follow up if you have any questions. I appreciate your comment.
Thanks for sharing. I suffer from piriformis syndrome, especially recovering from onset. Wondering if you have any tips, since sitting/laying makes it worse not sure how to rest properly after it flares. Thanks!
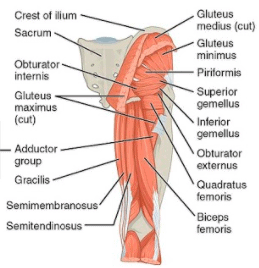
I’m sorry to hear that you’re experiencing piriformis issues, Colleen! Unfortunately, it’s a very common problem in cyclists, and the general population. Your question is a challenging one, considering I don’t have the opportunity to assess the situation, but I’ll do my best. When you think about sleep position picture your spine being a straight line and try to maintain it. I recommend my patients sleep on their back with pillows under the knees. Or on the side with a pillow between the legs. For sitting, get a good lumbar roll and try to sit as upright as possible. Thank you for the kind words and support! I hope this helps. I plan to publish a cycling posture article soon. Please keep in touch.
I need help any help I have sciatica and piriformis muscle pinched it is only in my ankle area . The sides of my ankle is where I can’t walk one month tomorrow. Excruciating pain on the sides of my ankle can’t get rid of the pain. The only thing that works is Biofreeze temporary they’re going to do a piriformis joint injection next week, excruciating pain and can’t walk far only in my ankle area. What could it be? I’m scared it is making me depressed and make a living
I can’t imagine the pain and frustration you feel. It’s clear that you’re under the care of a medical professional. I recommend that you follow the advice of your healthcare provider. Please remain positive. Most piriformis syndrome cases resolve in time with the proper treatment. My best to you, Kenneth!
Hi, I’m so frustrated as I went for a professional bike fit and they adjusted everything saddle height, handle bars and distance to stretch. The next day I did 50 miles and I was literally in bits afterwards and couldn’t walk, bend or sit down for two weeks. I went back and they readjusted and made the stretch shorter so I was more upright, which improved but I still get the pain in my piroformis. Every ride I have to take ibruprofen to stop the pain happening. What do you suggest?
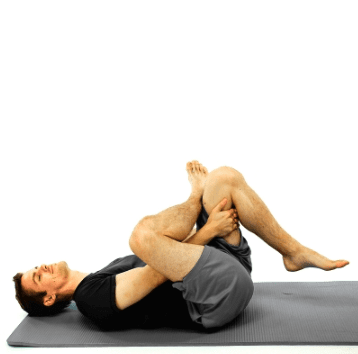
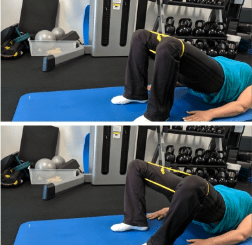
I feel your pain and frustration, Lorna. Even the most skilled bike fitting professional can’t correct our biomechanics and muscle imbalances. Have you tried the flexibility and strength program suggested in the article? If so, you may want to consult a Physical Therapist for a more thorough evaluation.
I hope this helps. You WILL get through this. Be persistent and patient.
Warm regards,
Chris
I believe I have piriformis syndrome. Pain usually happens after cycling hard for about an hour. I don’t have it while cycling. Only when I’m done. The pain doesn’t go away after that. Keeps coming back when I walk or sit or whatever I do. Will try these to see if it will help resolve the issues.
Sorry to hear that you’re experiencing those symptoms. Give the exercises a try. If you’re consistent they should help manage your pain in 4 to 6 weeks, possibly sooner. Good luck!
I have pain doing the muscle activation routine. Does that mean I am on the right path?
I wouldn’t say it’s the “right path.” Pain is never right. However, if you’re in the acute phase or your spinal mobility is limited, a transition period is expected. Monitor your symptoms, and if they persist or worsening discontinuation or modify the exercise. Don’t give up. We will find the proper formula for your body.
I’ve been an endurance unicyclist since 2006, and I usually ride the same Trails as most mountain bikers, but about 10 days ago I started feeling extreme pain in my buttocks toward the outer hip with some of the pain leading down to my calf. I suspected piriformis syndrome. I tried tracing my steps but I couldn’t figure out what could have caused this issue. So for the last 10 days I have followed the usual routine of ice and Heat and pain meds including muscle relaxers. Only in the last couple of days did the pain subside enough that I could walk with relatively no pain, so I decided to go out for a test ride today and it seemed to go well and I didn’t experience any pain while riding. But now, couple hours after the ride I’m starting to feel pain again like I did a few days ago when it was really bad. How Will I Know when it’s okay to resume my regular riding schedule. Will I have to wait until the pain is 100% gone? I’m using a walking treadmill to keep moving at home and trying these stretching exercises.